Point of Sale (POS) Printer stations allows you to identify the different printer stations to which the system can send and print specific menu item orders to. These are associated with kitchen stations, see Configure Kitchens for Point of Sale (POS). This command is important if you have multiple kitchens. For example, you may have a Main kitchen and a Bar kitchen station configured, and associate all beer or wine or other beverages with the Bar station. This allows the system to send the beverage section order to the bar printer, so that the bartender can fill the order and have it waiting for the staff to pick up, whilst sending the food order to the Main kitchen station. You may also have separate Point of Sale (POS) printer stations set up if you have multiple outlets such as a restaurant and a gift shop, to ensure that any checks for items purchased in the gift shop are printed out in the gift shop and not in the restaurant.
If your Property does not currently have our Point of Sale (POS) Module and you are interested in adding it, please contact us at Sales@SkywareSystems.com.
Select POS/Printer Stations from the Menu Items Set Up section of the Point of Sale (POS) Configuration menu.
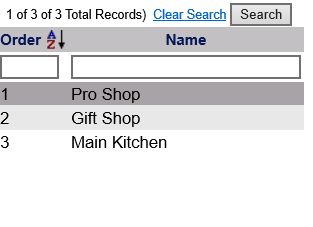
The POS/Printer Stations screen display is split into two frames, with the left side of the screen listing any POS/Printer Stations already configured for the property and the right side containing the fields you need to complete in order to add or edit a POS/Printer Stations for the property. Any changes made on the right, once saved, will be updated in the listings to the left.
The currently configured POS/Printer Stations options can be displayed by:
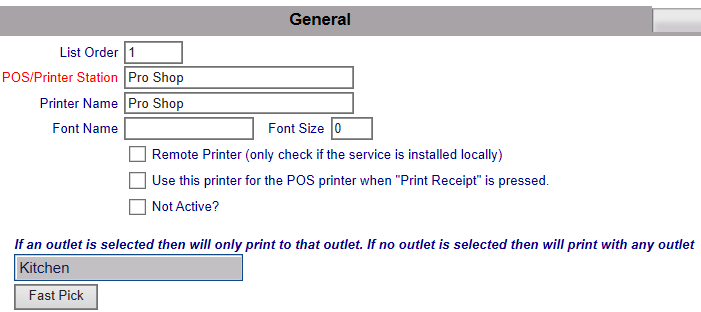
List Order: This determines where the POS/Printer Station appears listed in the interface.
Name: The names of the POS/Printer Stations can be sorted alphabetically or a particular kitchen searched for manually.
Selecting any POS/Printer Station will display the details on the right.
Your options include the following:
Generate a new entry:
Click the New  button from the toolbar to add a new POS/Printer Station.
Complete the fields described below.
OR:
Select an existing POS/Printer Station from the list on the left, and click the Replicate  button from the toolbar.
Then change the field information as described below.
Edit the current selection:
Change the field information described below.
List Order: This determines in what order the POS/Printer Station appears listed in the interface.
Enter a number into the List Order field.
This field is optional, If no order is specified, the POS/Printer Stations are listed in alphabetical order in the Point of Sale (POS) interface.
POS/Printer Station: This is the label that appears for the POS/Printer Station in the interface.
This field is required. Be sure to use a label that staff can easily identify to select for the specified items, especially if you have multiple kitchen stations in multiple restaurants on your property.
Printer Name: Set the printer for this station. This field is optional, but if you have more than one station in an outlet you need to specify which printer is associated with which station.
Font Name: This is the name of the font used on anything printed from this station.
This field is optional in that if it is left blank, it will default to Arial for printing.
Font Size: This is the size of the font that will appear on anything printed from this station.
This field is optional in that if it is left as 0, it will default to size 10 for printing.
Remote Printer: This box can be checked or unchecked. The default option is unchecked. It should only be checked if the service is installed locally. (Remote printer NOT installed on the server - MUST have the corresponding service installed locally).
Remote Print Jobs
There is a second panel on the POS/Printer Station Maintenance right hand side display, which when clicked will list the details of any remote print jobs: If the Remote Printer option box is checked, this is where the details will be.

Use this printer for the POS printer when "Print Receipt" is pressed: This box can be checked or unchecked. The default option is unchecked.
Not Active?: This box may be checked or unchecked. By default, it is unchecked.
It should only be checked if the POS/Printer Station is no longer in use.
Once a POS/Printer Station has been added to the list on the left, it will remain in the list (cannot be deleted) if there has been any checks created for it. Once a check is created, it exists in several places in the system, and therefore there cannot be a check for somewhere that does not exist.
If an outlet is selected then will only print to that outlet. If no outlet is selected then will print with any outlet: This is an auto-fill box and cannot be changed from this page.
Fast Pick: Clicking this button will take you to a pop up screen with the list of available outlet options to choose from.
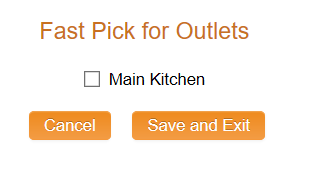
Choose then click the orange button "Save and Exit". This will return you to the POS/Printer Station Maintenance page.
When you are finished adding or editing POS/Printer Stations, click the Save  button to save the changes.
To view any changes made, click the Activity log  button in the local tool bar.
Date Updated March 24, 2025